Grant Special Access for Quizzes
Special access permissions allow instructors to:
- Set alternative access dates for individual or groups of students
- Provide extended time for individual or groups of students
- Allow additional quiz attempts for individual or groups of students
Common uses for this include accessibility accommodations, students traveling for official university events during scheduled quizzes, students who are ill, or students who have an otherwise excused absence, etc. This can also be used to exempt students from using LockDown Browser for a quiz that may be required for other students (such as those taking a quiz from home).
Time Saving Tip: To streamline the special access process, Instructors can set a user’s accommodation for all quizzes offered in the course using the Grant Quiz Accommodations in the Classlist steps.
It’s important to note that adding special access does not exclude others from accessing a quiz. If you would like a quiz to only be delivered to specific users, we recommend using release conditions. Learn more on the Set Release Conditions for a Quiz page.
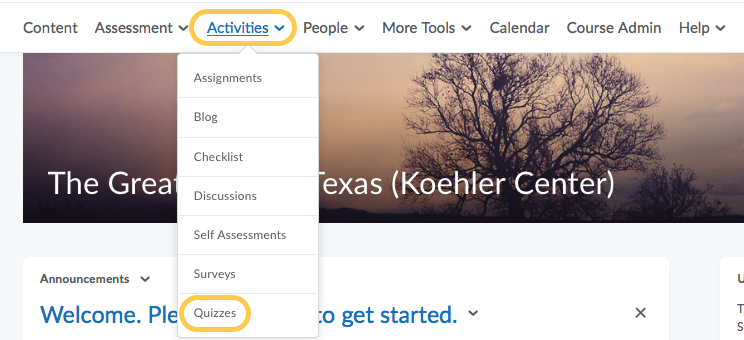
- On the navbar, click the Activities menu, then select Quizzes.
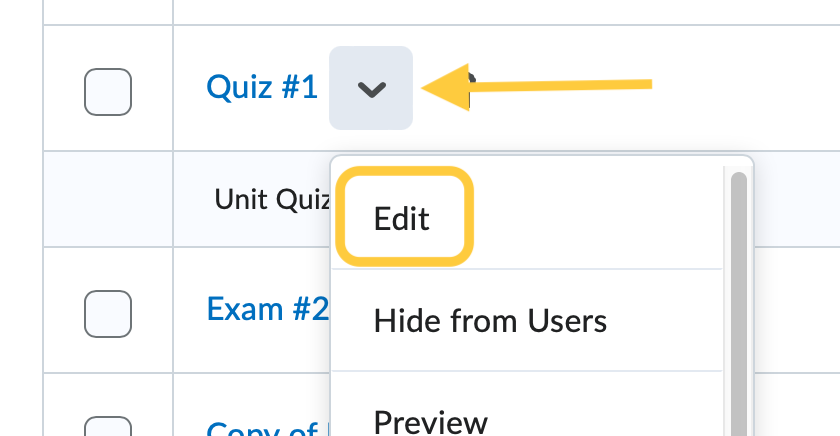
- On the Manage Quizzes page, from the context menu of the quiz, click Edit.
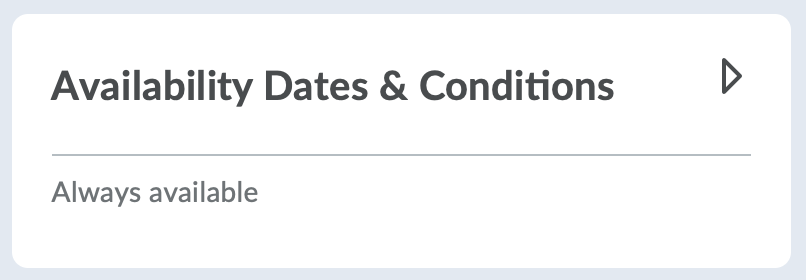
- Select the title on the Availability and Conditions panel to expand these options and set your preferences.
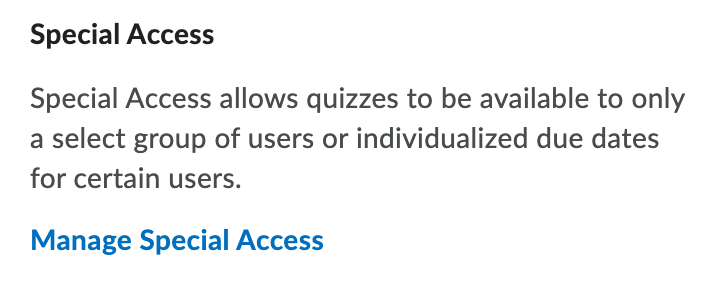
- Under Special Access click Manage Special Access.
- Under Special Access, select the Allow selected users special access to a quiz radio button, then click Add Users to Special Access.
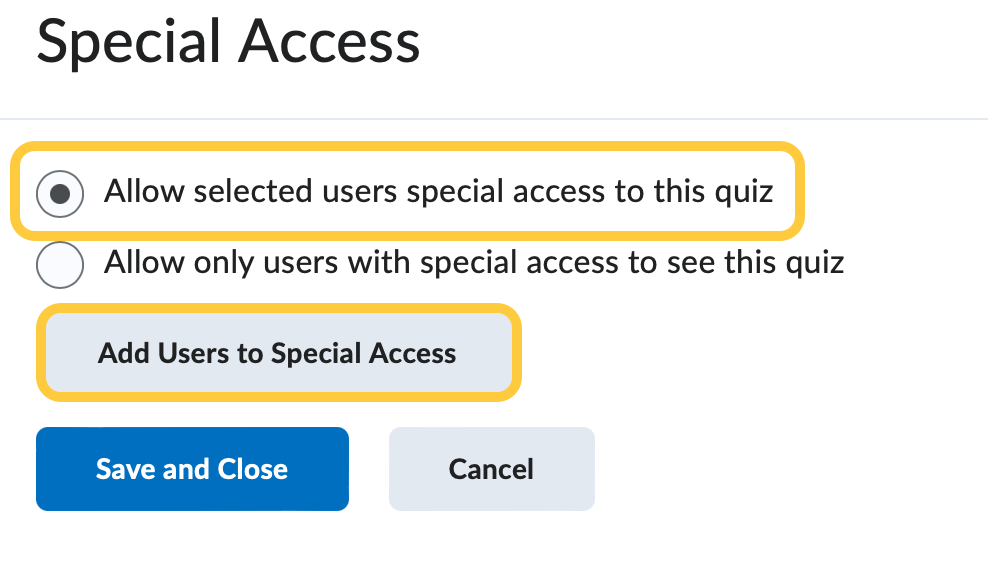
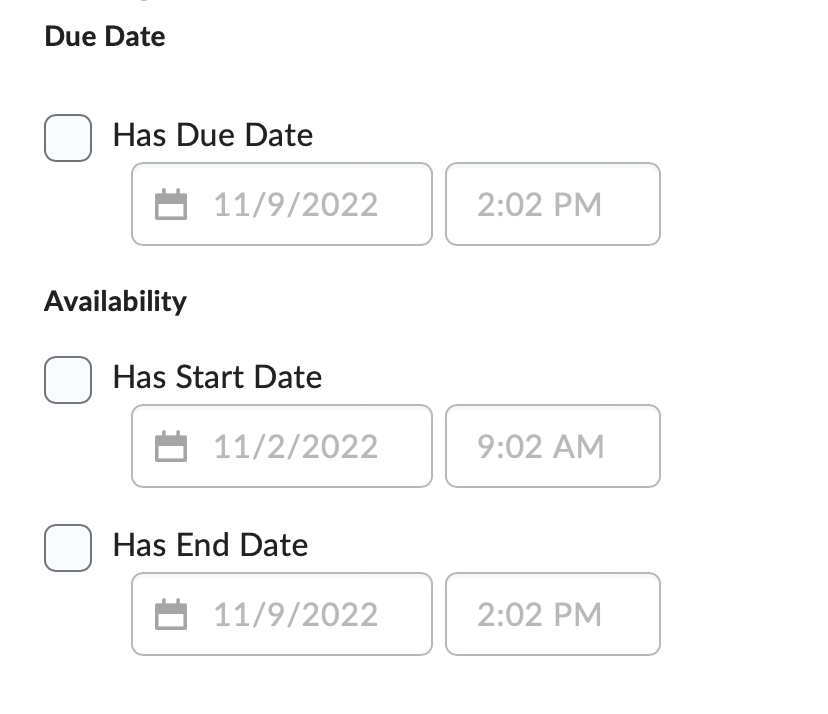
- On the Special Access Properties page, check the box, then select the date and time to set the special access for Due Date/Time and Availability Start Date/Time and End Date/Time, if different than the dates for the rest of the students.
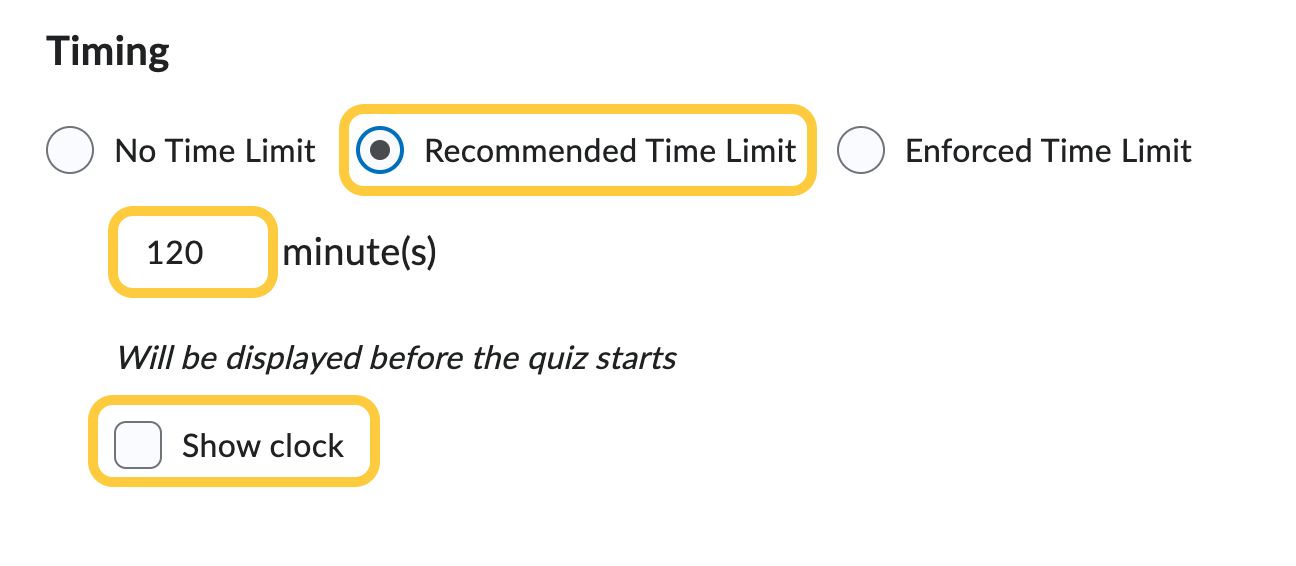
- Time Limit: Under Timing, select either No Changes (to grant the same amount of time as the rest of the class), No Time Limit, Recommended Time Limit, or Enforced Time Limit to set a different time allowed for the quiz (use this if a student needs 30 extra minutes for example).
- No Changes (default) will grant the same amount of time for the quiz as students who do not have special access granted.

- No Time Limit – this option is great for reducing test anxiety for students.

- Recommended Time Limit – With this option, instructors can set the recommended time in minutes students should expect to take for the quiz, and an option to show a clock.
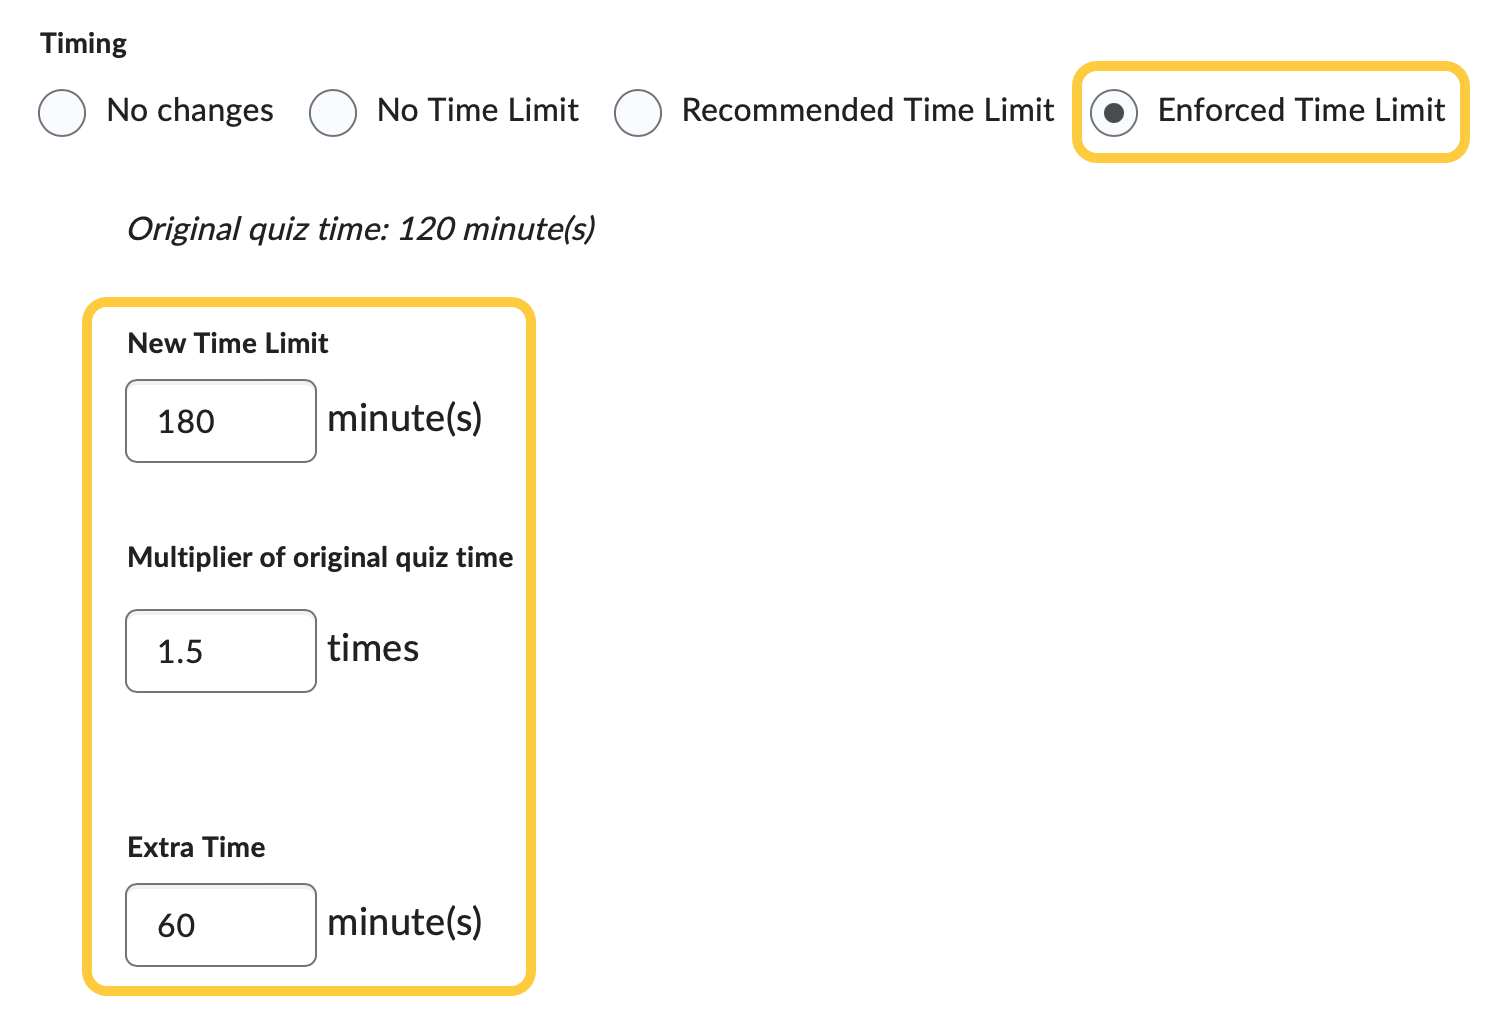
- Enforced Time Limit – If you are using an Enforced Time Limit, you are required to set a Grace Period and choose an Exceeded Time Limit Behavior.
Enter either a new time limit, a multiplier of the original quiz time, or extra time.
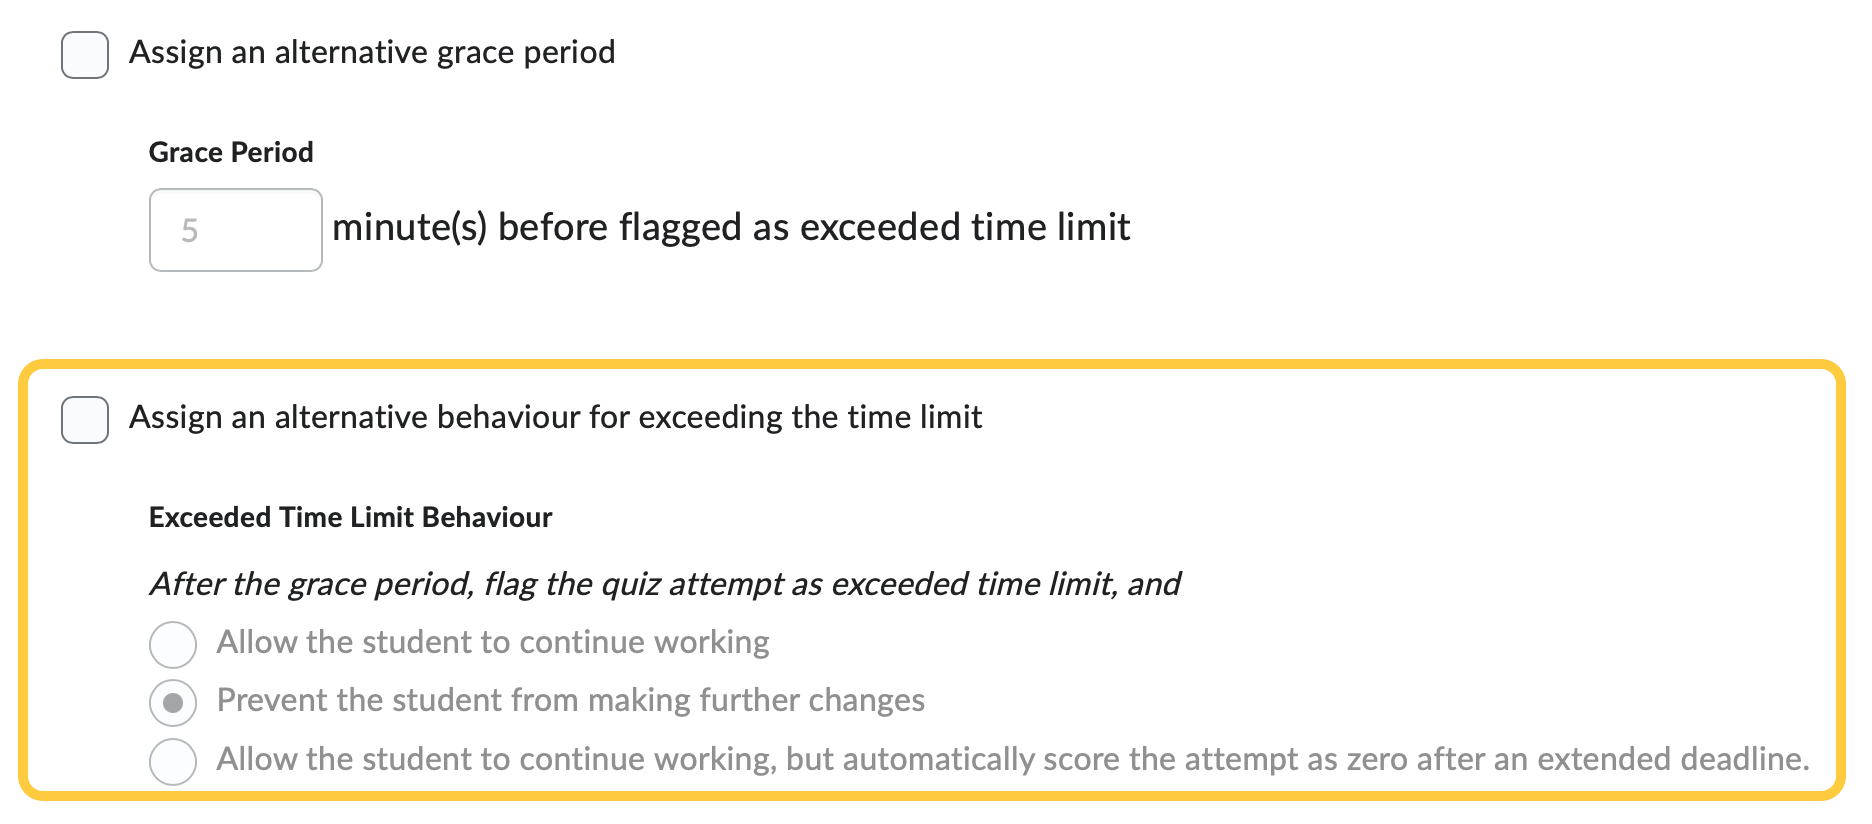
- Grace Period – The grace period is an additional amount of time students may be granted to work on a quiz that is not shown on the timer. Instructors can set the grace period for a quiz to 0 minutes, in place of the default grace period setting of 5 minutes. Despite it being possible to set a grace period of 0, it is not recommended. Setting a grace period can support student accessibility requirements and other situations, such as slow internet connections when completing quizzes.
Entering a 0 minute grace period flags the quiz attempt as exceeded immediately when the quiz time limit is reached by the learner. Quiz attempt logs display when the student attempt exceeds the regular time limit, grace period time limit or any extended time limit. Grace period of 0 minutes can be set for quizzes with special access restrictions as well. Despite it being possible to set a grace period of 0, it is not recommended. Setting a grace period can support student accessibility requirements and other situations, such as slow internet connections when completing quizzes.
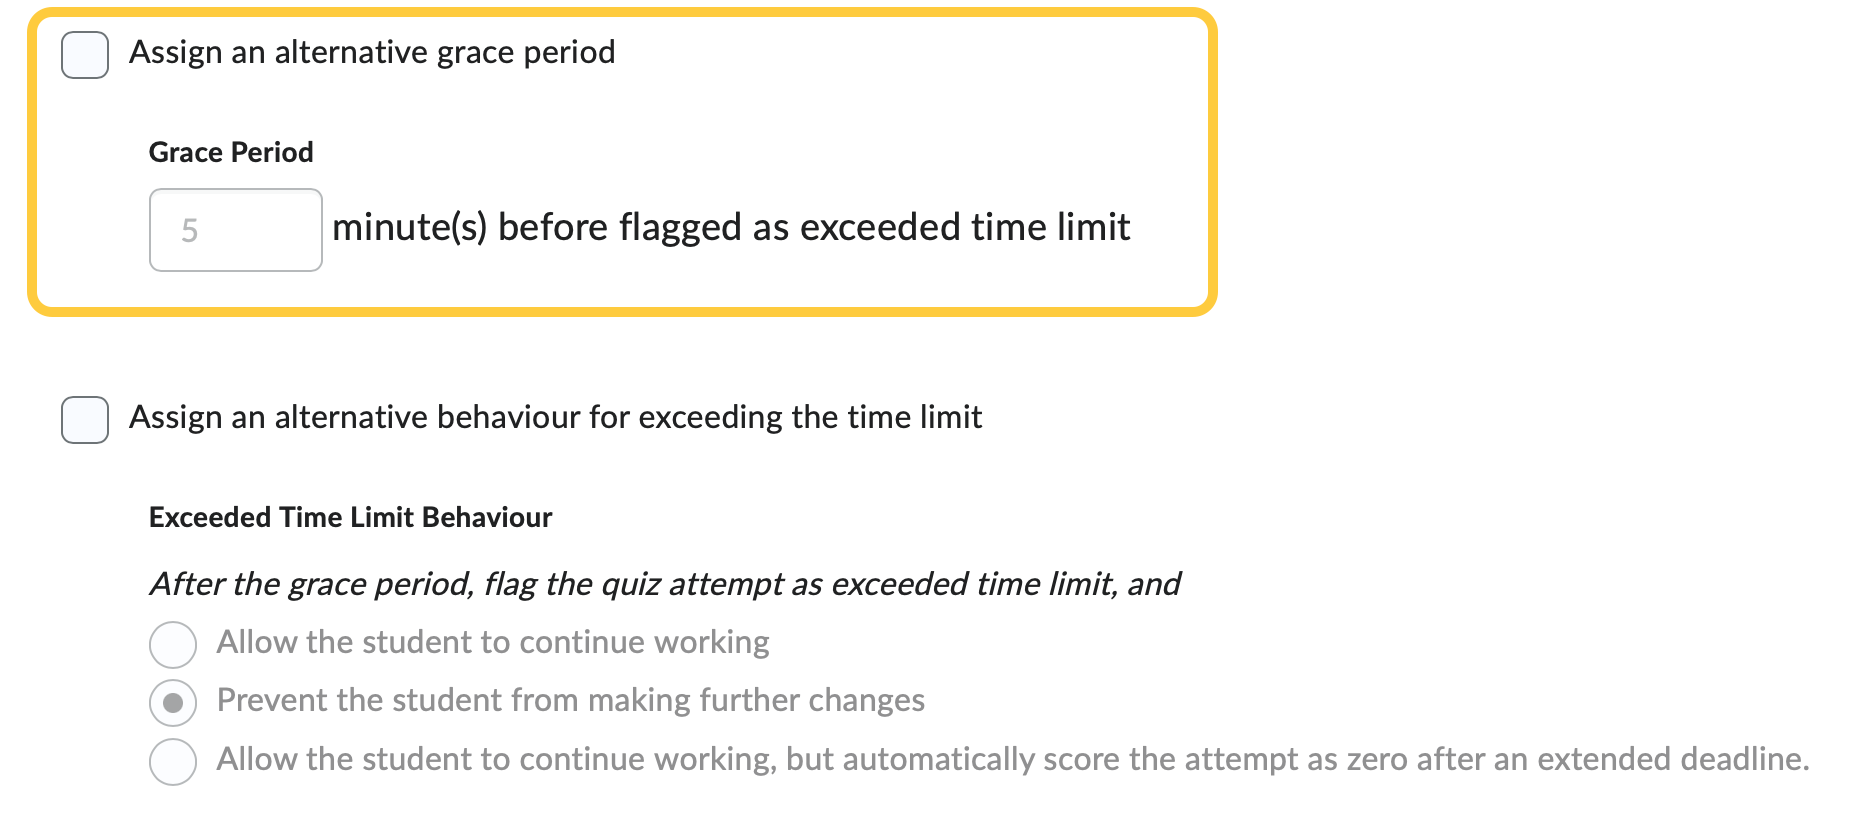
- Exceeded Time Limit Behavior – If the student has not submitted the quiz after the Enforced Time Limit and the Grace Period have expired, the quiz attempt will be flagged as “exceeding the time limit.” There are three options for determining the behavior of the quiz at this point.
- Allow the student to continue working: The student may keep working as long as needed, with no restriction on completion.
- (Most commonly used) Prevent the student from making further changes: The student is no longer able to make any changes to their answers, and they must submit the quiz.
- Allow the student to continue working, but automatically score the attempt as zero after an extended deadline: Choosing this option opens an Extended Deadline time selection, with a minimum time of one minute after the grace period ends. Once the time limit, the grace period, and the extended deadline limit have all been exceeded, the quiz will automatically be assigned a grade of zero upon submission.
This will allow you to set a Time Limit, you will be able to designate the time limit, assign an alternative grace period, and determine how to handle late behavior. A new time limit can be set by either entering a new time limit, setting the multiplier of the original quiz time, or by manually entering the extra time allowed. Entering a number in any of those fields will update the other fields automatically. By default, the grace period and late behavior will adopt the settings of the quiz. If desired, you can assign an alternative grace period and set alternative late behavior.
- Grace Period – The grace period is an additional amount of time students may be granted to work on a quiz that is not shown on the timer. Instructors can set the grace period for a quiz to 0 minutes, in place of the default grace period setting of 5 minutes. Despite it being possible to set a grace period of 0, it is not recommended. Setting a grace period can support student accessibility requirements and other situations, such as slow internet connections when completing quizzes.
- No Changes (default) will grant the same amount of time for the quiz as students who do not have special access granted.
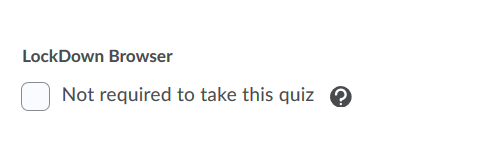
- Optional: Under LockDown Browser, check the box to remove the requirement for LockDown Browser (if you have enabled LockDown Browser). Checking this box will exempt the students you add Special Access from having to use LockDown Browser for their quiz.
- Optional: Under Attempts, if you wish to allow additional quiz attempts, check the box to Override attempts allowed then select the number of attempts allowed. Click Apply.
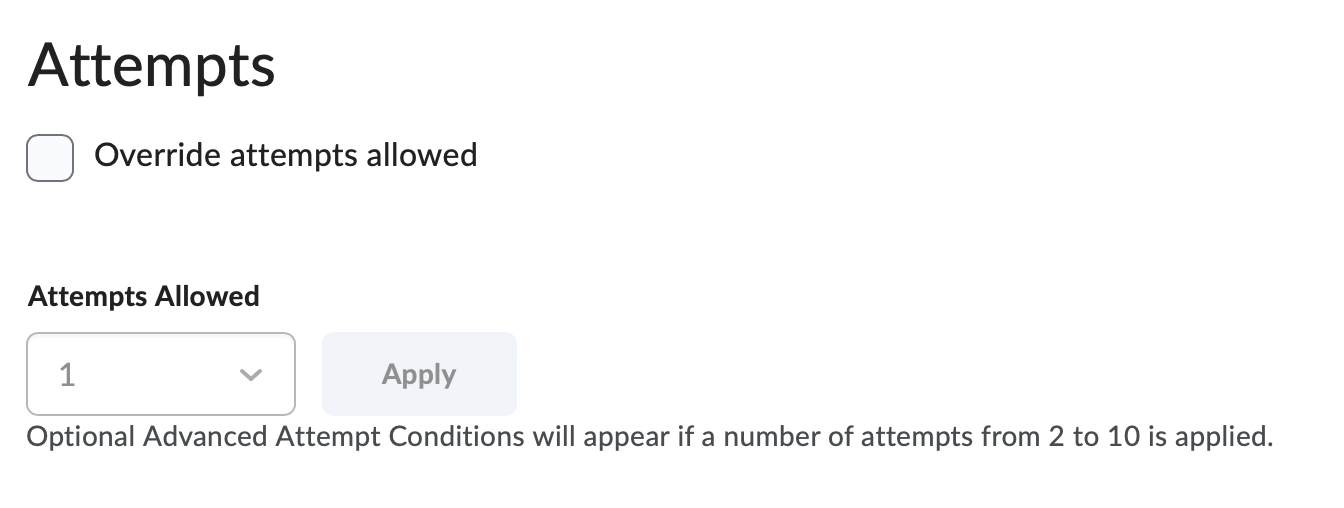
Note: if you enable multiple attempts then the Advanced Attempt Conditions options become available to further set criteria for students to access additional attempts. - In the Users area, check the box for the student(s) that you want to add special access.
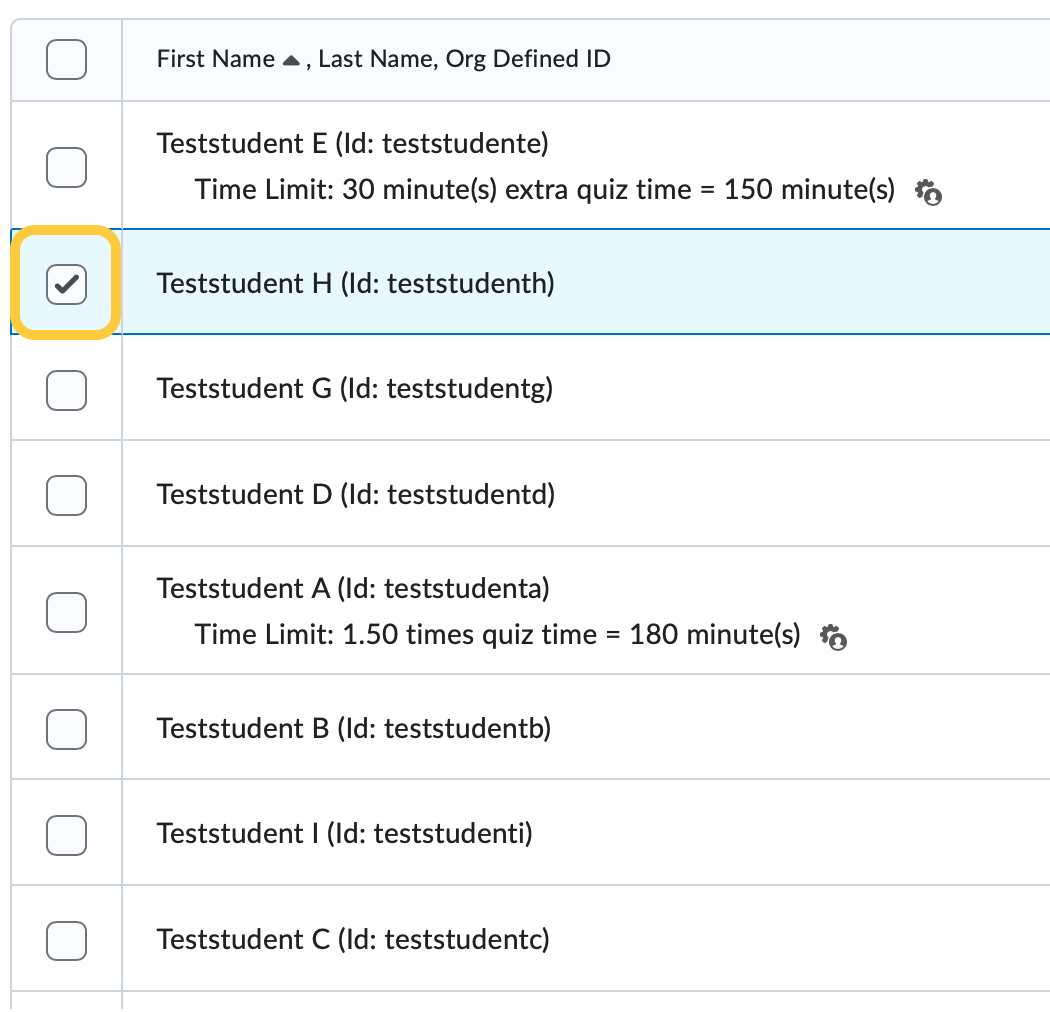
- Click Save.
- Click Save and Close.
Important Notes:
- The special access settings do not apply to all quizzes in a course offering automatically. You must add special access for learners to each quiz separately.
- After extending the learners quiz time by way of quiz time multipliers or +minutes on the Special Access page, if an instructor updates the duration of the quiz, the learner’s quiz time on the Special Access page does not dynamically update at this time.
Edit Special Access
- On the navbar, click the Activities menu, then select Quizzes.
- On the Manage Quizzes page, from the context menu of the quiz, click Edit.
- Select the title on the Availability and Conditions panel to expand these options and set your preferences.
- Under Special Access click Manage Special Access.
- Under Special Access, the users who have special access will be listed, including details about their access.
- To edit their special access, click the pencil icon. Then modify the access settings
- To remove the special access, click the X icon.
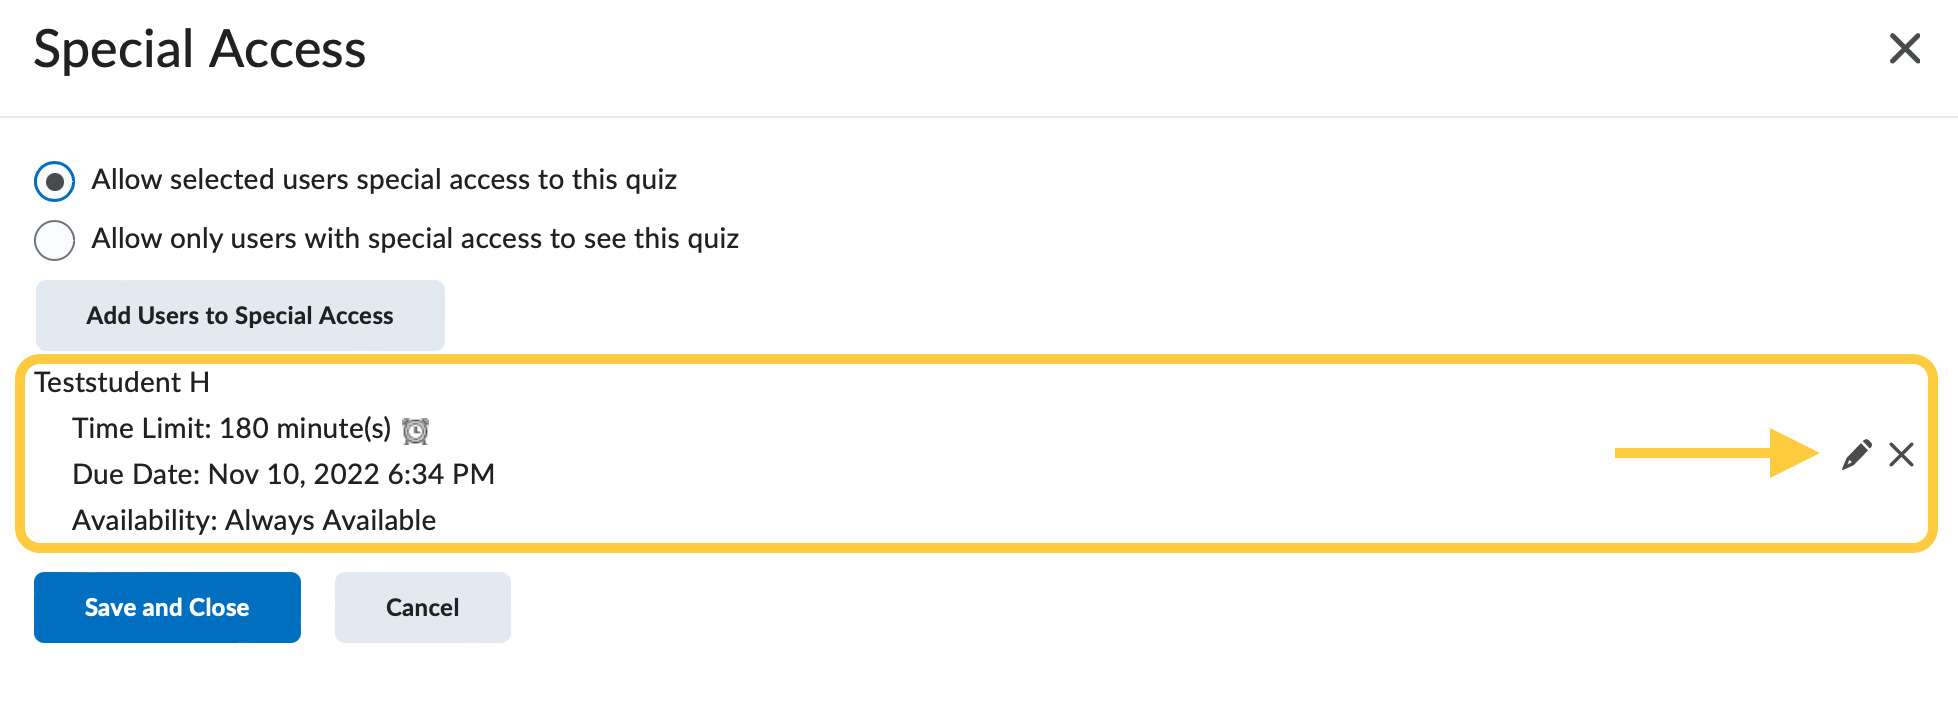
- Click Save and Close.