Set Availability and Due Dates for a Discussion Forum or Topic
Instructors can set the Availability for a Discussion in the Discussions tool, and in Content if the discussion topic exists as a content topic within a module. When an instructor updates the Availability for a discussion in the Discussions tool, it is automatically updated in the associated content topic, and vice versa.
The Availability Start and End Dates each will have a set of three options. You will be able to select one option for each date. By choosing an option, you are deciding whether students can see the discussion, access it, and interact with it.
Important: Students will be unable to view graded rubrics associated with your discussions IF the Discussion Forum availability is set to Visible with access restricted.
Discussion Forum and Topic Availability Details
Discussion Forums
- Visible with access restricted means students:
- Can see the forum name, dates, and other restrictions
- Cannot click the forum to access it
- Cannot see the forum description
- Cannot see topics within the forum
- Cannot see graded rubrics
- (Default Setting) Visible with submission restricted means students:
- Can see all details of the forum including description and all topics within it
- Cannot post to any topic within the forum
- Hidden means students:
- Cannot see forums that are hidden before or after start/end dates
Discussion Topics
- Visible with access restricted means students:
- Can see the name, dates, other restrictions, topic stats, last post author
- Cannot see the topic description
Cannot click the topic to access it or participate - Will see the topic count toward content progress
- (Default Setting)Visible with submission restricted means students:
- Can see the names, dates, other restrictions, topic stats, last post author
- Can the topic description
- Cannot post (participate) in any topic
- Will see the topic count toward content progress
- Hidden means students:
- Cannot see topics that are hidden before or after start/end dates
- Hidden topics are not counted toward content progress
Note: Topic visibility and access can be inherited by a parent forum, but a greater level of restriction specifically on any topic in a forum overrules inheritance from the parent forum. For example, a topic marked as hidden before a start date is considered to have a greater level of restriction; thus, such a topic would be hidden within a visible but submission-restricted forum.
Set Discussion Availability Date Defaults
These defaults determine the behavior applied when adding availability dates to activities. You can customize individual activity availability dates from their create and edit screens.
- On the nav bar, click Course Admin.

- Click Availability Date Defaults.

- Under Discussions, set your preferred Before Start Date default settings for Discussions in your course. Options include:
- Visible with access restricted before start: The topic/forum will be visible to students before the Start date, but they cannot click/open it.
- (DEFAULT) Visible with submission restricted before start : The topic/forum will be visible to students before the Start date and they can access it but cannot post new threads or replies. This effectively makes a discussion read-only.
- Hidden before start: The topic/forum will be hidden from students until the Start date. Calendar events for Availability Starts and Availability Ends will be hidden until the Start date. Notifications will also not be sent until the Start date.
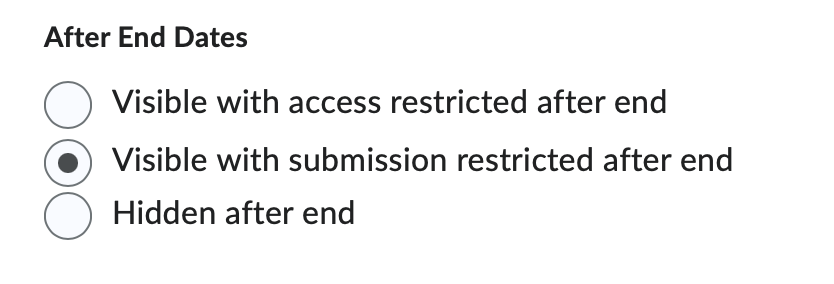
- Under Discussions, set your preferred After End Date default settings for Discussions in your course. Options include:
- Visible with access restricted after end: The topic/forum will be visible to students after the End date, but they cannot click/open it.
- (DEFAULT) Visible with submission restricted after end: The topic/forum will be visible to students after the End date and they can access it but cannot post new threads or replies. This effectively makes a discussion read-only.
- Hidden after end: The topic/forum will be hidden from students after then End date. Calendar events for Availability Starts and Availability Ends will be hidden after the End date. Notifications will also not be sent after the End date.
- Click Save.
Set Availability for a Discussion from the Discussions Tool
If you haven’t already, follow the steps to Create a Discussion Forum and Create an Open or Group Discussion Topic.
- On the nav bar, click the Activities menu, then select Discussions.

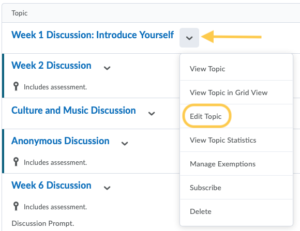
- On the Discussions page, from the context menu of the discussion you want to set dates for, click Edit Topic.
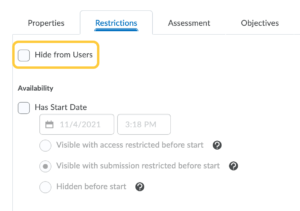
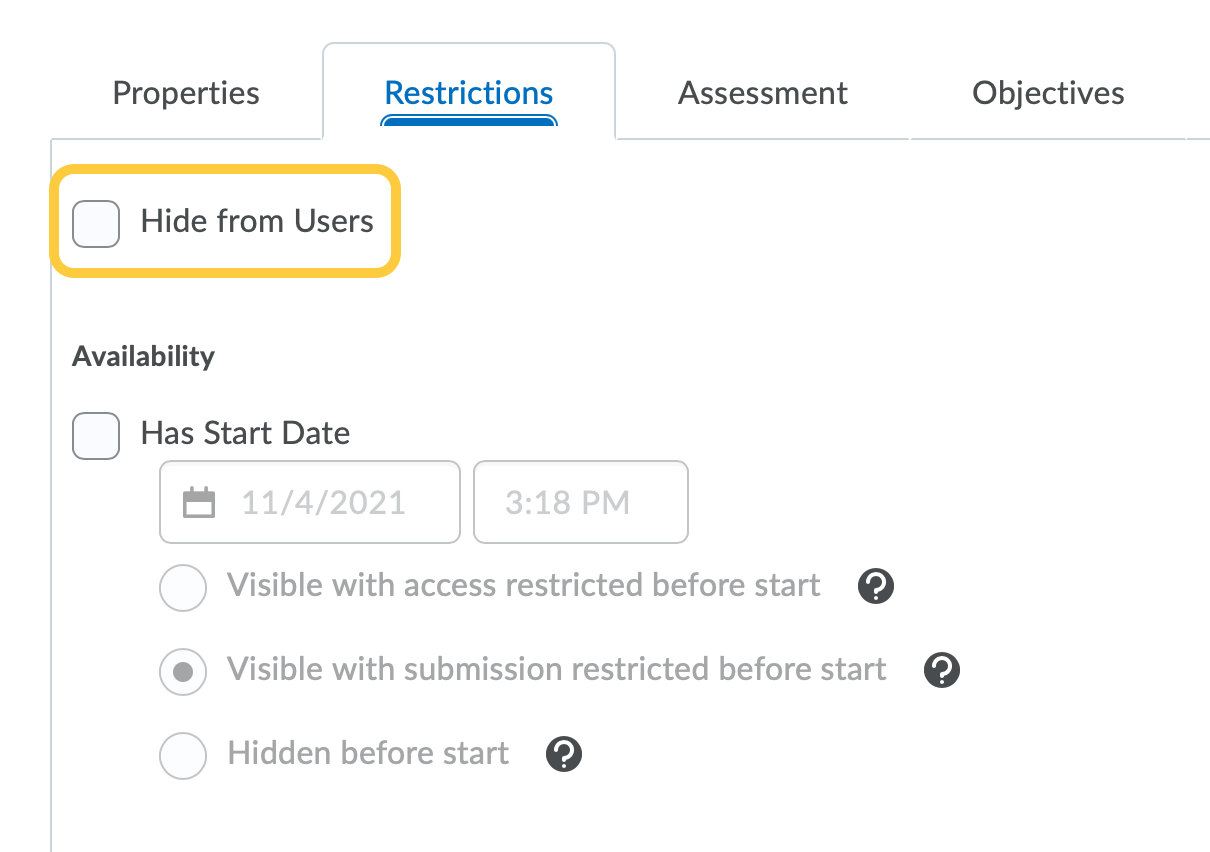
- Click on the Restrictions tab, then uncheck the Hide from Users option.
- In the Availability section, do any of the following.
- Set a Start Date: The start date determines when a discussion becomes available to students. If a Start Date is not selected, then the students will be able to access and interact with the discussion without date restrictions.
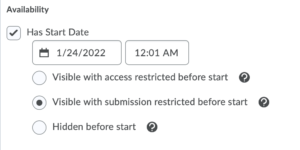
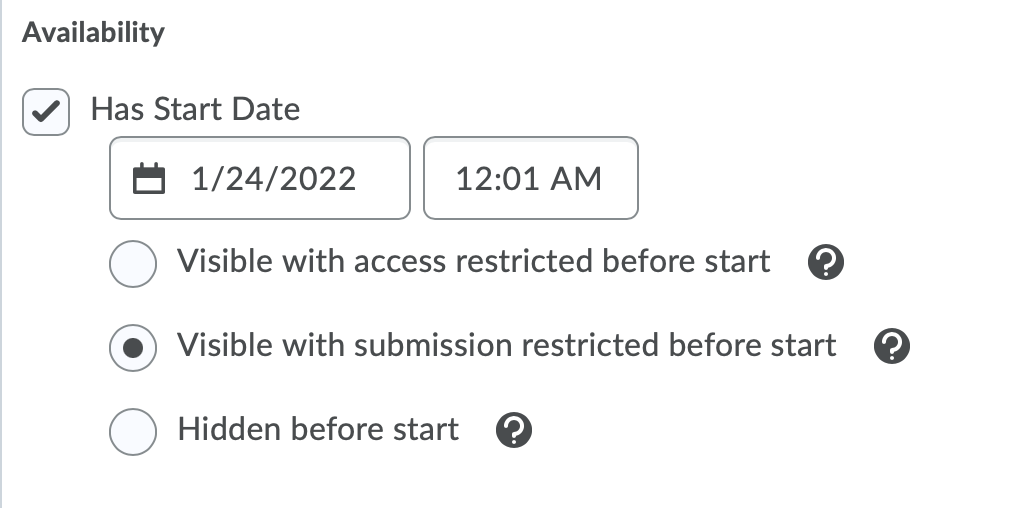
- Check the box for Has Start Date.
Set the Date & Time for the Start Date by clicking anywhere in the Start Date field. Then select a date from the calendar, and enter the time the discussion becomes available. By default, the date and time will match today’s date and time. - Set the Availability Start Date Properties – Choose from one of the following:
- Visible with access restricted before start: The topic/forum will be visible to students before the Start date, but they cannot click/open it.
- (DEFAULT) Visible with submission restricted before start : The topic/forum will be visible to students before the Start date and they can access it but cannot post new threads or replies. This effectively makes a discussion read-only.
- Hidden before start: The topic/forum will be hidden from students until the Start date. Calendar events for Availability Starts and Availability Ends will be hidden until the Start date. Notifications will also not be sent until the Start date.
- Set an End Date: The end date determines when a discussion is no longer available to students. If an End Date is not selected, then the students will be able to access and interact with the discussion without date restrictions.

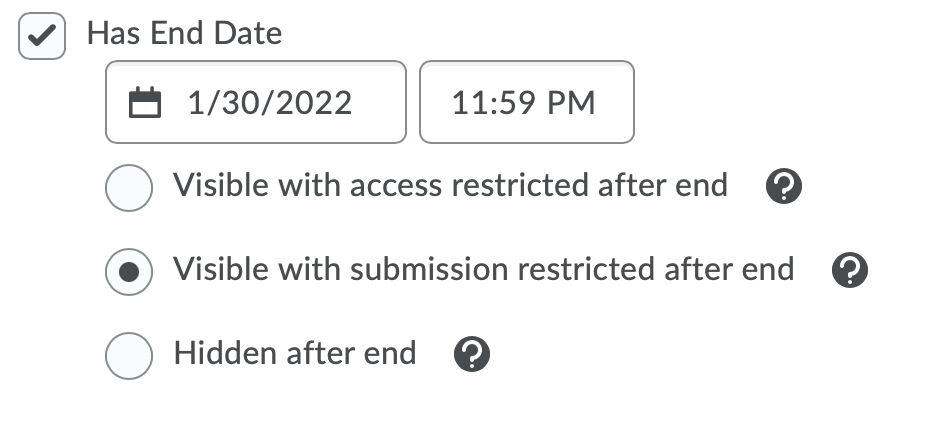
- Check the box for Has End Date.
- Set the Date & Time for the End Date by clicking anywhere in the End Date field. Then select a date from the calendar, and enter the time the discussion availability ends. By default, the date and time will match today’s date and time.
- Set the Availability End Date Properties – Choose from one of the following:
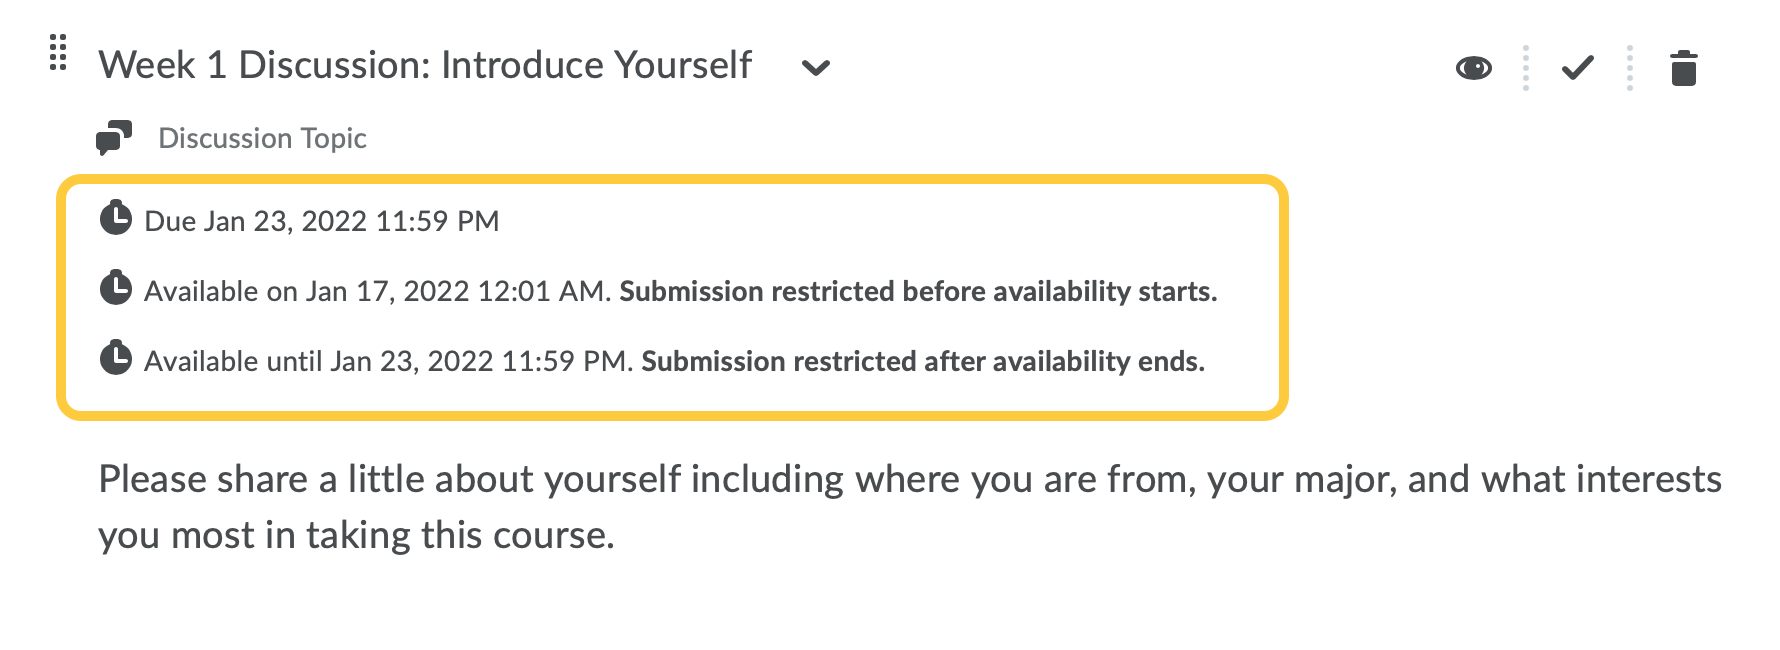
- Visible with access restricted after end: The topic/forum will be visible to students after the End date, but they cannot click/open it.
- (DEFAULT) Visible with submission restricted after end: The topic/forum will be visible to students after the End date and they can access it but cannot post new threads or replies. This effectively makes a discussion read-only.
- Hidden after end: The topic/forum will be hidden from students after then End date. Calendar events for Availability Starts and Availability Ends will be hidden after the End date. Notifications will also not be sent after the End date.
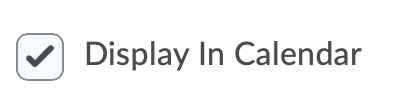
- Recommended: Check the box to Display in Calendar. When Display in Calendar is selected, the Discussions tool will create a calendar event for each Availability date that specified. If Start date is set, show an “Availability Starts” event in the Calendar. If End date is set, show an “Availability Ends” event in the Calendar

- Check the box for Has Start Date.
- Set a Start Date: The start date determines when a discussion becomes available to students. If a Start Date is not selected, then the students will be able to access and interact with the discussion without date restrictions.
- Click Save and Close.
Set Availability and Due Dates for a Discussion from the Content Tool
Currently, Due Dates for discussions can only be set from within the Content tool. If you have not done so already, see Add a Discussion to a Content Module to add your existing discussion to Content.
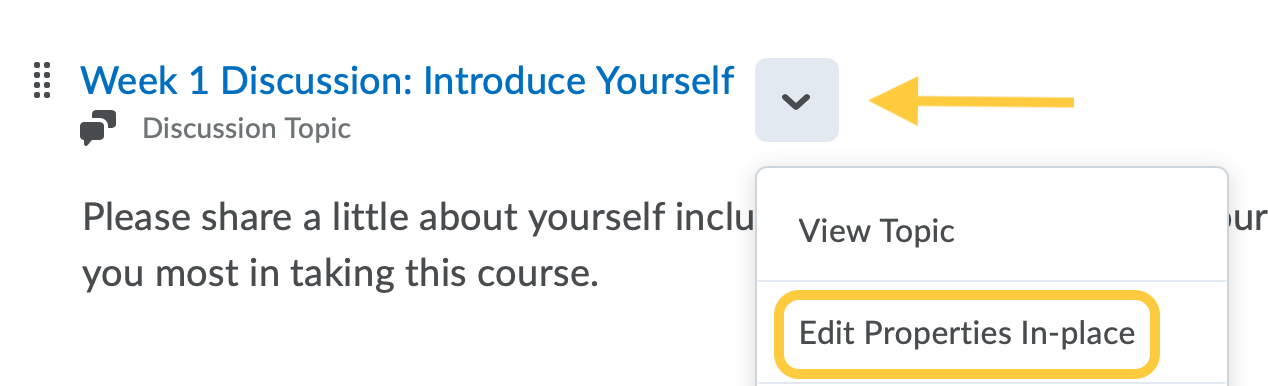
- On the nav bar, click the Content link.

- Select the module in which the discussion exists as a content topic.
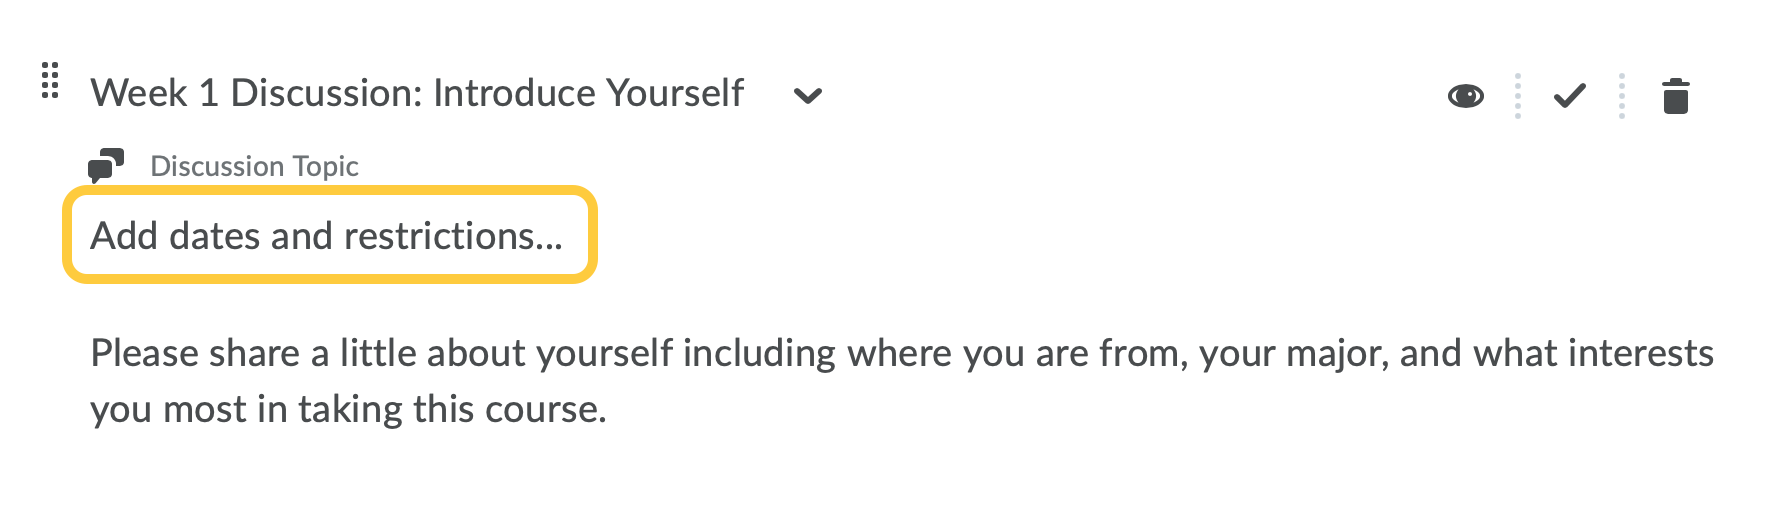
- Click the context menu next to the discussion and select Edit Properties in Place.
- Click on Add dates and restrictions.
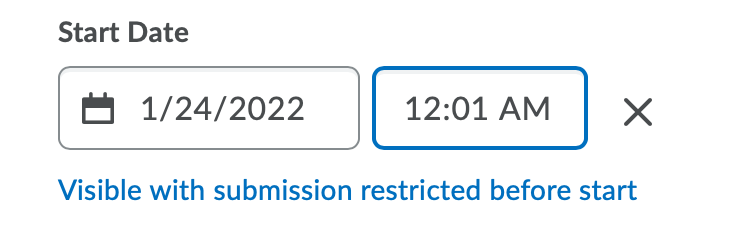
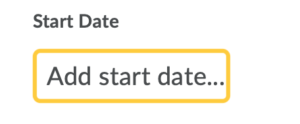
- Set a Start Date: The start date determines when a discussion becomes available to students. If a Start Date is not selected, then the students will be able to access and interact with the discussion without date restrictions.
- Click on Add start date...
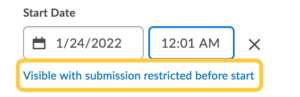
- Set the Date & Time for the Start Date by clicking anywhere in the Start Date field. Then select a date from the calendar, and enter the time the discussion becomes available. By default, the date and time will match today’s date and time.

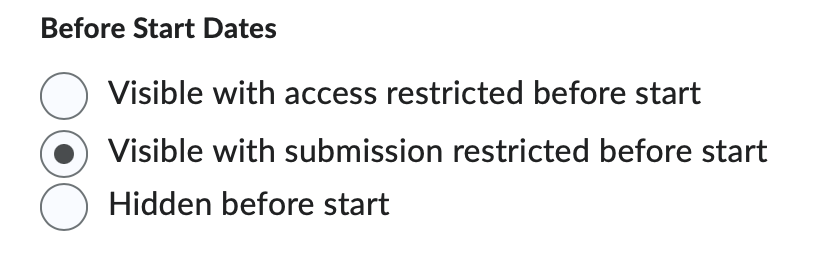
- Set the Availability Start Date Properties. By default, the availability property Visible with submission restricted before start is selected. If you wish to select another availability property, click the link to make a new selection in the pop-up window. The availability property options are:
- Visible with access restricted before start: The topic/forum will be visible to students before the Start date, but they cannot click/open it.
- (Default) Visible with submission restricted before start : The topic/forum will be visible to students before the Start date and they can access it but cannot post new threads or replies. This effectively makes a discussion read-only.
- Hidden before start: The topic/forum will be hidden from students until the Start date. Calendar events for Availability Starts and Availability Ends will be hidden until the Start date. Notifications will also not be sent until the Start date.
- Optional: To remove a date, click the “X” next to the editable field.
- Click on Add start date...
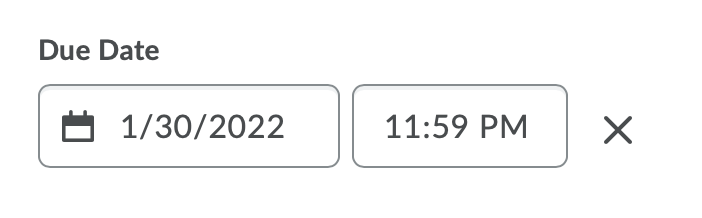
- Set a Due Date: Note: A Due Date for a Discussion can only be set within the Content tool.
- Click on Add due date…
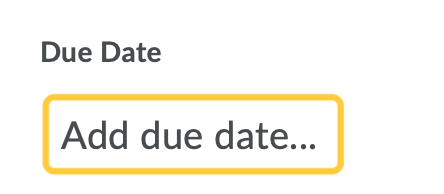
- Set the Date & Time for the Due Date by clicking anywhere in the Due Date field. Then select a date from the calendar, and enter the time the discussion is due. By default, the date and time will match today’s date and time.

- Optional: To remove a date, click the “X” next to the editable field.
- Click on Add due date…
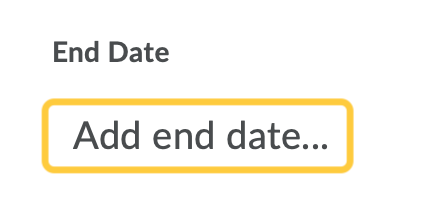
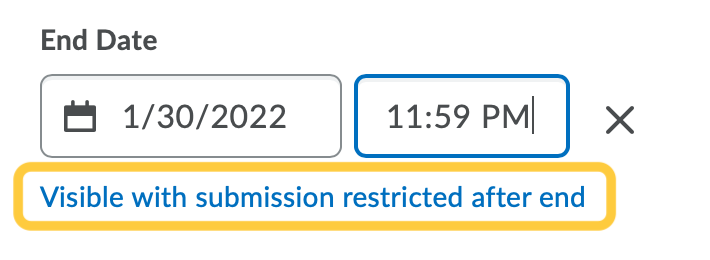
- Set an End Date: The end date determines when a discussion is no longer available to students. If an End Date is not selected, then the students will be able to access and interact with the discussion without date restrictions.
- Click on Add end date…

- Set the Date & Time for the End Date by clicking anywhere in the End Date field. Then select a date from the calendar, and enter the time the discussion availability ends. By default, the date and time will match today’s date and time.
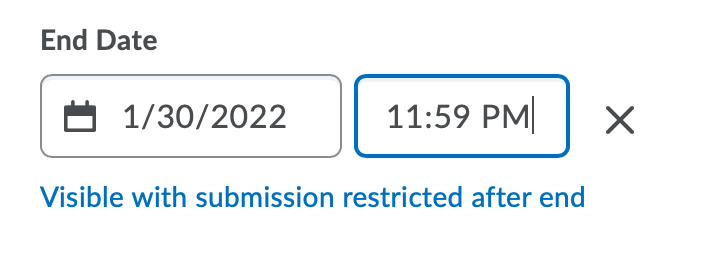
- Set the Availability End Date Properties. By default, the availability property Visible with submission restricted after end is selected. If you wish to select another availability property, click the link to make a new selection in the pop-up window. The availability property options are:
- Visible with access restricted after end: The topic/forum will be visible to students after the End date, but they cannot click/open it.
- (DEFAULT) Visible with submission restricted after end: The topic/forum will be visible to students after the End date and they can access it but cannot post new threads or replies. This effectively makes a discussion read-only.
- Hidden after end: The topic/forum will be hidden from students after then End date. Calendar events for Availability Starts and Availability Ends will be hidden after the End date. Notifications will also not be sent after the End date.
- Optional: To remove a date, click the “X” next to the editable field.
- Click Update to save the dates.
- The dates set will display under the Discussion topic within the Content module.
- Click on Add end date…