Change a Course Image
There are three ways to change/set a course image: from the My Courses widget on the My Home page, from a course’s homepage, and from course admin within a course. This page will guide you on changing or setting the course image in all of these locations.
Option 1: Change the Course Image for a course from the My Courses Widget on the My Home page
The course tiles in the My Courses widget on the TCU Online My Home page display default images assigned from the curated image library provided by D2L. Instructors have options if they wish to change the default image:
- Select a different image from the D2L image library.
- Upload your own image.
The course image will display in the My Courses widget, and will display as the course banner on the course homepage. The image will also be available to include in the course components that you export, copy, or import.
Either A) Select an Image from the D2L Image Library
- Log into TCU Online.
- Locate the course for which you want to modify the course image in the My Courses widget. If you do not see your course listed immediately, review how to Locate & Pin Courses in TCU Online.
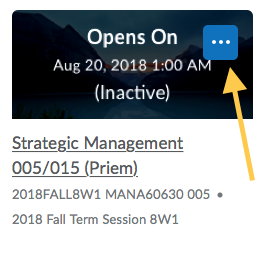
- Hover over the course image and click the Actions menu (the icon with 3 dots).

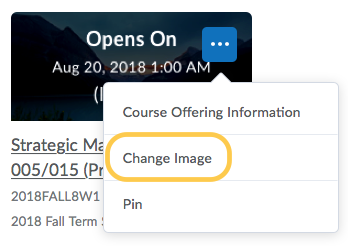
- Select Change Image or press Enter.

- Search or browse the list of available images.

- Hover over the image you want to use and click Use this image.

or B) Upload Your Own Course Image
Instructors can upload their own image to be used for the course image and banner for their course. All standard image file types are supported. We recommend course images be 2400 x 960 pixels and that they don’t contain text. This ensures they can be resized to look great in different contexts and on different devices, and also adhere to accessibility guidelines.
- Log into TCU Online.
- Locate the course for which you want to modify the course image in the My Courses widget. If you do not see your course listed immediately, review how to Locate & Pin Courses in TCU Online.
- Hover over the course image and click the Actions menu (the icon with 3 dots).

- Select Change Image or press Enter.

- In the Change Image library, select Upload.

- Click My Computer, then click Upload to browse and locate the image on your computer. Once your image is located, click Add.
- Click Save.
Option 2: Upload a Course Image from Course Admin
Note: This option does not allow you to search the image library for an image, it only allows you to upload an image or choose from a previously uploaded image.
- On the nav bar, click Course Admin.

- Click Course Offering Information.

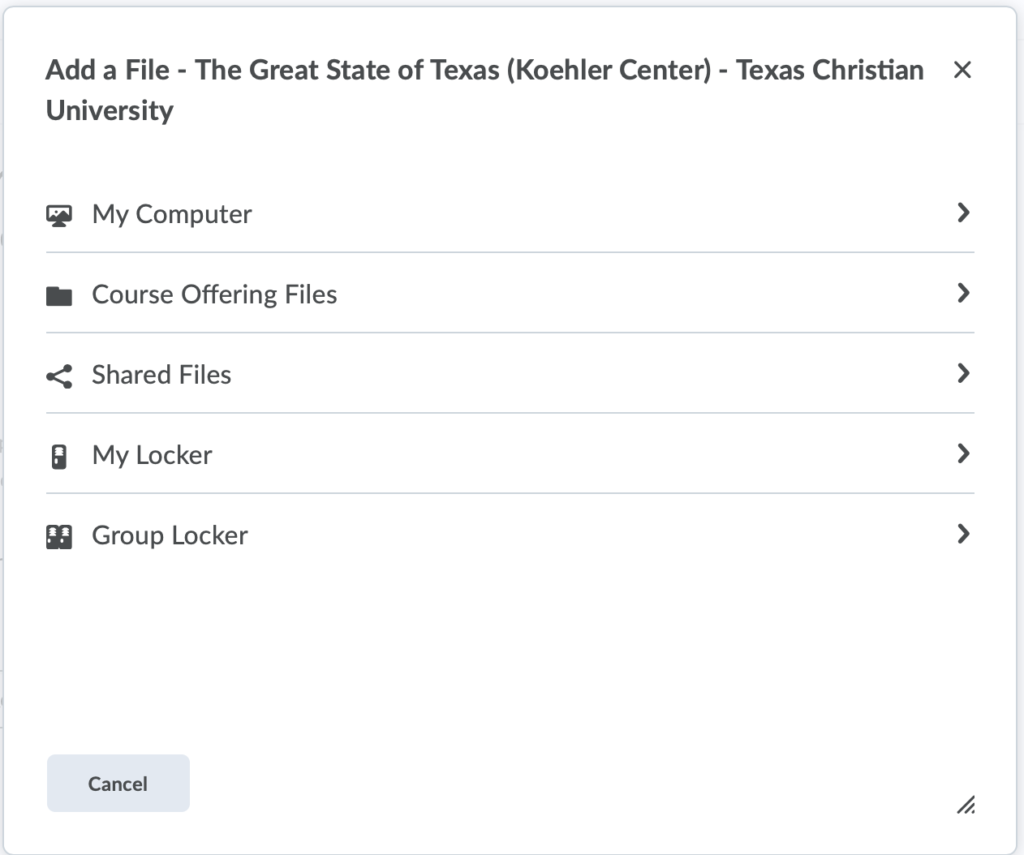
- On the pop up window that displays, select to add a file from either My Computer (to upload from your computer), Course Offering Files (to select a file already uploaded to your course), Shared Files (if shared images are available), My Locker (if you have uploaded an image to your locker), or Group Locker (if you have uploaded an image to a group locker). Click the option you wish to select, and then follow the steps to upload your image.
Note: All standard image file types are supported. We recommend course images be 2400 x 960 pixels and that they don’t contain text. This ensures they can be resized to look great in different contexts and on different devices.

- Optional: Check the box for Display the image in a banner on the course homepage if you would like the image to display within the course.
- Click Save.
- Click on the course title at the top of the screen to view your image on your course homepage.
Option 3: Upload the Course Image from the Course Homepage
- From within a course, hover over the course image and click the Actions menu (the icon with 3 dots). Select Change Image or press Enter.

- Do either:
- Select an image from the image library:
- Upload an image
- Click Save.
- Click on the course title at the top of the screen to view your image on your course homepage.