About the Special Course Admin Role
Special Courses consist of courses that utilize TCU Online for special programs or other entities not listed with the Registrar (e.g. program orientations, etc.). Special courses require at least one Special Course Admin. The Special Course Admin role consists of the same permissions as the Professor role, but includes the ability to enroll/unenroll students (individually or in bulk from a file).
How-to directions for Special Course Admins are listed below.
If you wish to request a special course, please submit the Request a Special Course form. The form will ask you to designate a Special Course Admin.
What kind of courses can Special course Admin be in?
Special Courses consist of courses that utilize TCU Online for special programs or other entities not listed with the Registrar (e.g. program orientations, etc.). This role will not be used for classes listed with the Registrar.
Who can be Special Course Admin?
Only TCU faculty or staff may be Special Course Admins. Users who are TCU students or non-TCU users cannot be Special Course Admins.
How do I add/change a Special Course Admin in a course?
If you wish to add/change a Special Course Admin, please submit the TCU Online Support Form, providing the course information, and the name and TCU email address of the faculty or staff you wish to designate or remove as a Special Course Admin.
About Enrolling Users
Special Course Admins only have the ability to enroll users who will have a Student role in the course. Special Course Admins can enroll users one-by-one or in bulk by uploading a file. Instructions for both options are listed below.
- To enroll TCU users with non-Student roles: (e.g., Professors, TAs, etc.), the lead Professor/Special Course Admin for the course can submit the Request Additional Enrollments form.
Policies and Procedures:
For TCU Users:
- If a user has (or will soon have) a TCU ID number, they must be enrolled with their correct TCU credentials, including their TCU ID number, network username, and TCU email address. Enrolling users with incorrect credentials will impact their official enrollments and ability to login.
- It is imperative that you verify credentials including names, TCU ID numbers, network usernames, and TCU email addresses, prior to enrolling them. Any corrections to user accounts after enrolling them should be sent to the TCU Online Support Form.
Enroll TCU Users One-by-One
A TCU user is defined as a user who will have or already has a TCU ID number or email address. If a user is an incoming or current TCU student, faculty, or staff, these steps should be followed. Any user who will have a TCU ID number/email, but that has not yet been created, will need to be put on hold until the user creates these credentials.
- Log in to TCU Online, select the special course from the My Courses area of the Homepage.
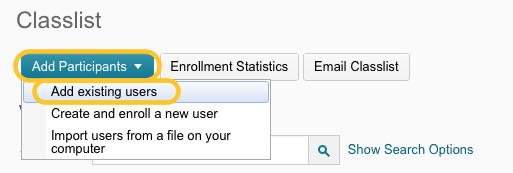
- Select Classlist from the Navigation bar.

- Select the Add Participants button, then Select Add existing users
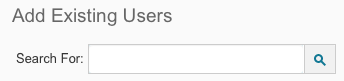
- On the page that follows, type the TCU ID number or email address of the user you need to enroll (we recommend this rather than searching by name since there might be multiple users with the same name). Click the Search icon.
- When you locate your user, select the Role dropdown menu and set their role to Student. Then, check the box next to their name and select Enroll Selected Users.

- A confirmation of enrollment page will display the user(s) that you enrolled. Click Done or Add more Participants to repeat steps 4-5 for adding any other additional users.
- Once your users are enrolled, we recommend emailing them this TCU user login script.
Bulk Enroll TCU Users from a File
A TCU user is defined as a user who will have or already has a TCU ID number or email address. If a user is an incoming or current TCU student, faculty, or staff, these steps should be followed.
When bulk enrolling TCU users from a file, it is imperative that you create the file using the correct TCU credentials, including their TCU ID number, network username, and TCU email address. Enrolling users with incorrect credentials will impact their official enrollments and ability to login. Any user who will have a TCU ID number/email, but that has not yet been created, will need to be put on hold until the user creates these credentials.
- First, build your file using the Import TCU Users From File Template as a guide. Note the example file formatting. TCU user credentials, such as first and last name, username, ID number, and TCU email address, must be added to the template file according to these user account requirements and formatting standards. Not following these requirements and standards when creating your template file will cause enrollment errors later. Refer to the example.

- TCU network username/alias will be their Username.
- TCU ID number will be their Org Defined ID.
- To learn how to locate the correct network username (alias), review these steps to Find a User’s TCU Network Username/Alias.
- Role will be Student.
- Once your template file is built, be sure to delete the first row.
- Log in to TCU Online, select the special course from the My Courses area of the Homepage.
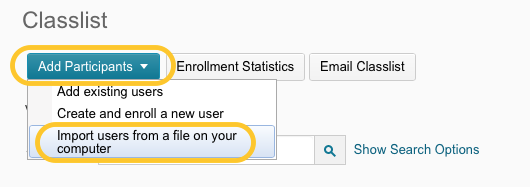
- Select Classlist from the Navigation bar.
- Select the Add Participants button, then Select Import users from a file on your computer.
- On the page that follows, select Choose File to select the file containing your roster in our template format. While you can, for TCU users, check the box to send an email notification to the student, we actually recommend that the notification come from you directly so they have context about what the enrollment is for.

- Click Import.
- On the page that follows, you will see a confirmation page that your users were enrolled. If you see an error, it is likely due to a problem with the data entered in your file. The most common issue is forgetting to delete the first row containing the column information (first name, last name, username, etc).
- Click Done.
- Once your users are enrolled, we recommend emailing the following to them. This script is specific to TCU users.
Unenroll Users
To unenroll users from your course, follow the steps below.
- Log in to TCU Online, select the special course from the My Courses area of the Homepage.
- Select Classlist from the Navigation bar.
- Check the box next to the user you want to unenroll. If you wish to unenroll multiple

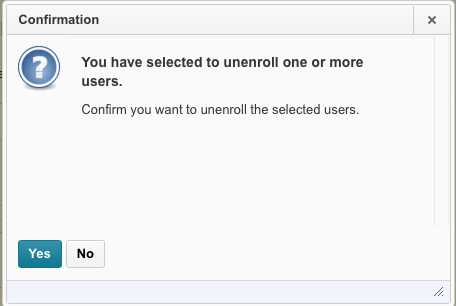
- Scroll up to the top of your classlist and select the link for Unenroll.

- On the confirmation box that opens, click Yes to confirm you want to unenroll.